Category Archives: iPhone
Misty Baby iPhone App Available Now
Posted by on October 20, 2011
UPDATE:
Great News… Misty Baby is Available Now, go, get it, have fun…
Download Here: http://itunes.apple.com/us/app/misty-baby/id466257998?mt=8
Misty Baby is an iPhone/iPod Touch application, a great pocket app for unlimited fun. A collection of cute babies, their sweet voice makes you crazy.
You have to rub the early morning mist from the body (the device screen) of the baby, and you will get baby reaction with sweet talks, laughing, crying etc. More you tickle smiling baby, or more you disturb the sleeping baby, you will get more fun.
Moreover, the app user max functionality of iPhone, the mist water drops is controlled by the accelerometer, you can make the multiple water drops flow over baby body, and make it more fun.
Just shake the device to fill the mist again. A great multi touch iPhone experience makes the misty touch a great experience.
The app allows your user to add the photos from the camera/library, and set as background theme. So get your kids photo and set it. Also even you can record the baby voice and add to the app, play with the kids,
a great fun time along with your family . You can have multiple pairs of photo/audio, app allows to save it within, a good user interface to select any saved themes/audios.
Chorus And Giggles:
The app has beautiful collection of various cute baby themes, and voice samples, you can find laughing, crying, talking, sleepy baby crying and many more…
To get more fun you can switch on Chorus, the multiple sound tracks play and make the ambience much more fun. Also switching on a list of giggles, makes the baby to react, you can just watch and see different baby reaction for each giggles.
Touch your creativity:
The app is a great place to touch your creativity, fill a baby with full of mist, start designing the screen with your creativity. A great fun time assured, best thing is you can share the creations via email or save it to your photo library, and use as wall paper.
The application has very good user experience interface, you can control the mist brush size, and many more other configurable options.
The Misty Baby definitely makes each and everyone max entertained, it fills the unlimited fun in your iPhone, you will ever stop laughing, its all fun fun fun from this Misty Baby.
FEATURES:
– Just rub the mist on the body of the cute baby and start hearing the cute baby voice.
– More you tickle, more the baby laughs, also more you disturb sleeping baby more it cries.
– Great collection of cute baby sounds.
– Chorus and giggle features makes the surrounding more fun.
– Add the photos and set as background. Record the voice and play along.
– Shake the device to fill the mist, it fills as if its real mist.
– Blow on the microphone, and let mist fill this way too.
– Ultimate mist graphics, you just feel your device as another wintery season house glass or your car window.
– Smily/Cry/Sleepy/Angry etc categories of baby photos as well as sounds.
– Share the misty baby photos with the touch of your creativity.
– Configurable options – baby actions, water drops, mist brush size etc.
– Make your device max use – Muti touch, Micro phone, camera, accelerometer, speakers, simply to say everything is utilized here.
– Retina graphics.
ALONG WITH FUN:
– A great companion for moms to make their baby laugh/make her sleep without any difficulty.
– For Pregnant women’s, this is your everyday health kit, to make you always happy and peaceful.
– Best for the travelers – add your kids, record their cute voice, play and forget your long journey time/tiredness.
– Add your favorite person photo, fill it with mist and write a nice quote and send it as a gift.
– Use your creativity and make your loved one more beautiful with ultimate misty designs, share it with family/friends.
Download Here: http://itunes.apple.com/us/app/misty-baby/id466257998?mt=8
Follow Misty baby in Facebook for the latest Misty Activities…
http://www.facebook.com/mistybabyiphone
Twitter: http://twitter.com/#!/mistyBabyiPhone
Visit Misty Baby website: http://www.mistybaby.com
Watch the demo video here: http://www.youtube.com/watch?v=LVyyA8nihM0
Go ahead and bookmark this page, we update the Misty News here… Try out Misty Baby, Have fun always…
Thanks again for reading this.
With Regards
Team i-CRG Labs
Color Picker for iPhone/iPad
Posted by on September 20, 2011
In this post lets discuss how a simple color picker can be implemented and used in general.
Some Important info:
The color picker is very simple tool and designed especially keeping iPhone in mind, even-though you can use it for iPad. We are using an image source for the target objective, here user selects or points a pixel space in the image source, our code reads the RGB values of that pixel.
Design:
The design is made keep in mind two things:
1. Every developer must be able reuse the source code.
2. Developer can easily change Graphics as per the custom requirements.
Technical Design:
Lets talk on how to get the color from the picker and give it to a delegate.
We have a protocol declared as follows: (in CRColorPicker.h) file
@protocol CRColorPickerDelegate <NSObject>
-(void)selectedColor:(UIColor*)inColor fromColorPicker:(CRColorPicker *)inColorPicker;
@end
You might have already observed, the protocol is compulsory, the object who uses this must implement the delegate method.
CRColorPicker class
In this class we do implement almost everything…we will handle touch events, calculate the color value for a given CGPoint etc etc…
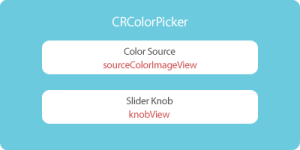
Please note that this sample doesn’t include the existing UISlider component, instead we uses a set of two images, which acts as the two parts of the slider, the body and the slider knob.
The CRColorPicker class, a subclass of UIView looks like this:
@interface CRColorPicker : UIView {
UIImageView *sourceColorImageView; //The imageview from where we pick the color source
id <CRColorPickerDelegate> delegate; //The delegate
UIColor *currentColor; //the current color picked
UIImageView *knobView; //the knob slider
}
Here we create an instance of UIImageView which holds the Color Picker source. Another UIImageView object represents the slider knob, so that the user can slide the knob across the color source ImageView. The idea behind this is, wherever the knob slider moves, we pick the point with respect to its superview (i.e CRColorPicker ) and the corresponding point in the color source image is a reference point to pick the color.
Moving the knob: Since the knob is again a UIImageView object (knobView), moving it across within the CRColorPicker is very easy. Just handle touch events methods, calculate the new frame of the knob, thats it.
When and how to calculate the color?
Now everything is ready. We have to call a method which picks the UIColor from the source color image.So we make sure that whenever the user slides the knob, we call this method, also as the touch event ends, call again the method.Note that [self changeColor]; is called on both touchesMoved and touchesEnded method.The changeColor method calculates the new point user selected and the respective color.
-(void)changeColor{
double sliderValue = CGRectGetMidX(self.knobView.frame);
CGPoint point = CGPointMake(sliderValue,5);
UIColor *colorSelected = [self pixelColorAt:point colorSource:self.sourceColorImageView.image];
CGRect newFrame = self.knobView.frame;
if([self.delegate respondsToSelector:@selector(selectedColor:fromColorPicker:)]){
[self.delegate selectedColor:colorSelected fromColorPicker:self];
}
self.currentColor = colorSelected;
}
Make sure you have implemented the delegate method in your controller class and also ensure you have set that controller as delegate of the class CRColorPicker.
Reading the pixel RGB values for a given point:
-(UIColor*)pixelColorAt:(CGPoint)point colorSource:(UIImage*)inImage;{
UIColor* color = nil;
// Create off screen bitmap context to draw the image into. Format ARGB is 4 bytes for each pixel: Alpa, Red, Green, Blue
CGImageRef srcImage = inImage.CGImage;
CGContextRef cgctx = [self createARGBBitmapContextFromImage:srcImage];
if (cgctx == NULL) { return nil; /* error */ }
size_t w = CGImageGetWidth(srcImage);
size_t h = CGImageGetHeight(srcImage);
CGRect rect = {{0,0},{w,h}};
// Draw the image to the bitmap context. Once we draw, the memory
// allocated for the context for rendering will then contain the
// raw image data in the specified color space.
CGContextDrawImage(cgctx, rect, srcImage);
// Now we can get a pointer to the image data associated with the bitmap
// context.
unsigned char* data = CGBitmapContextGetData (cgctx);
if (data != NULL) {
//offset locates the pixel in the data from x,y.
//4 for 4 bytes of data per pixel, w is width of one row of data.
int offset = 4*((w*round(point.y))+round(point.x));
int alpha = data[offset];
int red = data[offset+1];
int green = data[offset+2];
int blue = data[offset+3];
// NSLog(@”offset: %i colors: RGB A %i %i %i %i”,offset,red,green,blue,alpha);
color = [UIColor colorWithRed:(red/255.0f) green:(green/255.0f) blue:(blue/255.0f) alpha:(alpha/255.0f)];
}
// When finished, release the context
CGContextRelease(cgctx);
// Free image data memory for the context
if (data) { free(data); }
return color;
}
Here in this tutorial, we will use the color to set the background view of the UIView associated with the controller. And we have set the CRColorPicker view in the nib file itself, otherwise you can create an instance of the same and add it to the view programmatically.
This is how the sample looks:
Source code is here, please write us incase any questions. Use this source code wherever required and build a great iPhone application.
Please write your feedback, comments, suggestions.
Thanks for reading this tutorial, hope this helps you. In next tutorial lets discuss how we used this color picker in iPhone “Font View“, a free application made for the developers.
Regards
i-CRG Labs iPhone Team


